Gratitude Rocks for Kids: In this post, you will learn why painting gratitude rocks can be a great mindfulness activity for your family. We will share eight different ways to use your rocks. And, you will also find three step-by-step tutorials on how to prepare your hand-painted gratitude rocks
Gratitude is a feeling of appreciation for the good people and things in one’s life.
Gratitude is both an emotional state and attitude towards life that makes us more resilient and improves our wellbeing.
Many activities can teach kids about gratitude.
Preparing gratitude rocks is a really fun one.
Table of Contents
- Gratitude Rocks: A Family Mindfulness Activity
- 8 Fun Ways to Use your Gratitude Rocks
- How to Prepare your Gratitude Rocks (3 Tutorials)
Gratitude Rocks: A Family Mindfulness Activity
Lee Brower popularized the term “Gratitude Rock” when he participated in The Secret, a documentary about the power of positive thinking. Brower explained he always carried a rock in his pocket, and he made a point to think of something he was grateful for every time he touched this rock.
Our proposal today adds a few more layers to this concept.
Our gratitude hand-painted rocks combine in one single activity many “layers of goodness”:
- Gratitude
An opportunity to reflect on some of the good things and people in our lives. - Mindfulness
A fun mindfulness activity for all the family.
Mindfulness helps kids use their senses to focus on the present moment, away from worries.
I will “sprinkle” the painted rock tutorial with examples of mindfulness scripts for your fun craft session.
You don’t need to follow them, but it may give you some ideas of where you can raise a topic or approach the activity from a mindfulness perspective. - Art Therapy
A glimpse into the potential benefits of art therapy.
In art therapy, we use the art process to reflect, express, and discuss feelings and emotions. Our art (in this case our painting) is aiming to capture our grateful thoughts and feelings.
Often, rocks are used as a grounding tool, and to help anxiety relief and develop coping skills (we’ll talk about this again a bit later) - Arts & Crafts
A fun arts and crafts family activity.
8 Fun Ways to Use your Gratitude Rocks
There are lots of things you can do with your gratitude rocks.
These are just a few examples:
- Create a Gratitude Rock garden
Find a special place for your gratitude rocks, somewhere in the house where you will see them often and will remind you how thankful you feel. - Use them as Grounding Rocks.
Grounding helps you connect with the present moment.
A grounding rock is one that you keep in your pocket and hold when you feel overwhelmed.
Holding the rock helps you focus on the present and calm down.
A gratitude rock can serve this same purpose. Additionally, the words or ideas portrayed in your rock will remind you of the good things in your life.
Carry it in your pocket or your backpack, and be reminded of how thankful you feel. - Gratitude Rock Gifts
Design some beautiful gratitude rocks and gift them as present to somebody you care about. - “Thank You” Rocks
Use them as a thank you note for somebody who did something nice to or for you. - Treasure Box
Create a “treasure box” and keep your gratitude stones there. You can go back to your box as often as you wish and reflect on all the good things and people in your life - Decoration Rocks
Use them to decorate your garden, your bedroom, or any special place in the house - Gratitude Rock Jar
Every family member can put their (small) gratitude rocks in a glass jar. You can all see the pile of rocks grow over time. - Hidden Messages
Hide your kindness messages around your neighborhood for others to find.
Related activities: Gratitude Tree Activity (craft and worksheet)
(Disclosure: We are a participant in the Amazon Services LLC Associates Program, an affiliate advertising program designed to provide a means for us to earn fees by linking to Amazon.com and affiliated sites. As an Amazon Associate, I earn from qualifying purchases. There may also be other affiliate links in this post. You can also read our Disclosure & Disclaimer policy here)
How to Prepare your Gratitude Rocks
I’ve chosen three different themes that I feel will be in tune with gratitude choices kids may make:
- Family
- Being loved
- Pets
And, all through the tutorial, I will insert suggestions on how to turn this craft activity into a fun mindfulness family activity.
Materials for your painted rocks:
- Rocks
- Pencil and eraser
- Pens
- Paint
- Paintbrushes
- Sealant
- Glue
- Any fun decor that you’re gluing
Some tips:
- Where to buy rocks to paint?
Stones should not be taken from private gardens, public parks, or protected natural areas.
If you are having trouble finding rocks, you can always purchase them on Amazon, a local garden center, or at a local landscaping company.
Smooth stones/river rocks from craft stores are not a great choice as they may be coated and your design/paint won’t stick. - If you plan on painting, acrylic paint works best.
- If you plan on using a pen for your art, you can use paint markers (we suggest the Posca, Artistro, and Tooli-Art brands), artist pens, gelly roll pens, markers, highlighters, etc. These are the ones used for this project. And these are also a good option.
- If you’d like to glue anything to your rocks, we recommend the E6000 brand.
- We also recommend sealing your rocks after you’ve finished decorating them. You can use whatever finish you’d like (glossy, matte, etc). These can be found online or in your local craft stores. Our suggestions: Rust-oleum and Krylon brands.
- Are you feeling already overwhelmed? Well, nothing stops you from buying a ready-made kit like this one, or this other kit. 😉
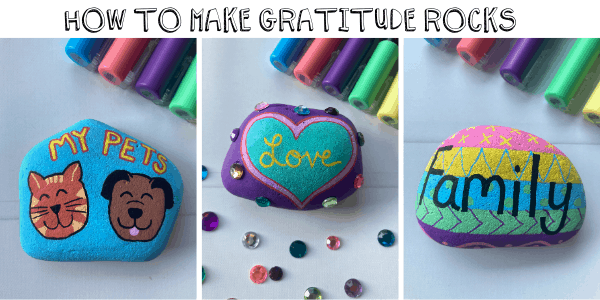
How to Make Gratitude Rocks
Note: steps 1 and 2 are common to all three projects.
- Get some nicely rounded rocks, big enough to fit your desired design.
- Clean your rocks and make sure they are free of debris before you start your design.
A Mindfulness Script Example:“Look at these really nice stones that we picked for our gratitude painted rocks. Look at the colors and the shapes.
Feel them with your hands.
Pick up the one you would like to use. It needs to be big enough for your drawing or the words you may write.
Close your eyes and feel the stone.
Is it rough or smooth?
Does it have pointy edges or round ones?
Is there soil or debris on it?
We will need to wash them well so that they are ready to be the canvas for our art.
**********
Open the tab and scrub the stone.
Feel the water on your hands, and focus on how your stone becomes cleaner and smoother.
You know, I’m grateful for nature, our beautiful trees, and plants.
And I am also grateful for this rock that will help us create some beautiful art full of special meaning for us.
***********
Now that we have our stones ready, let’s do something fun.
Close your eyes and think about something or somebody you are thankful for.
What do you love about that person/object?
How does it make you feel?
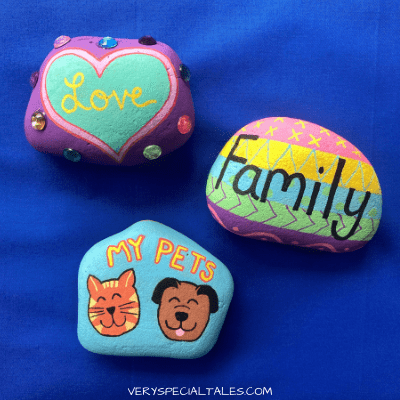
Rock 1: My Pets Gratitude Rock
- Outline the cat and/or dog head
Lightly trace your design with a pencil.
Leave enough room for your pet’s name on top of the rock.
A Mindfulness Script Example:
We are so lucky we have (pet name). How does it make you feel when you play with (pet name). It makes me happy when I arrive home and I realize how pleased (pet name) is to see us.”
(you can keep talking about your pets while you complete the drawing)
- Color in the head(s) with the main colors of their fur.
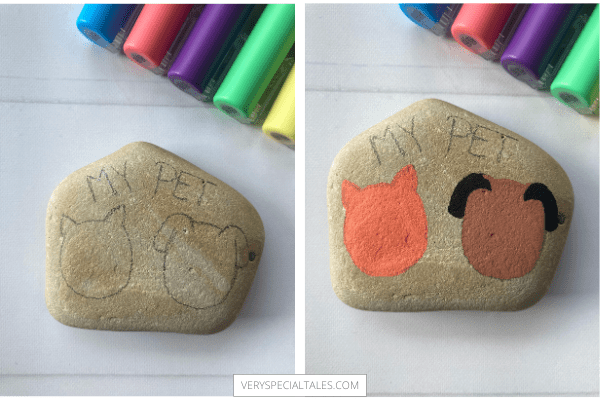
- Start adding details to the design
For the cat, we added stripes around their face and at the top of its head.
For the dog, we colored the ears, added the nose and the happy little mouth. - Outline the head(s) in black.
For the cat, we added the nose, mouth, eyes, and whiskers.
For the dog, we added the tongue, eyes, and a light line over the top of the nose.

- Choose a bright color for the background
- Write their name or “my pet(s)” in a bright color.
- Using a different color, outline the original letters to make them pop
- Spray the rock with sealant

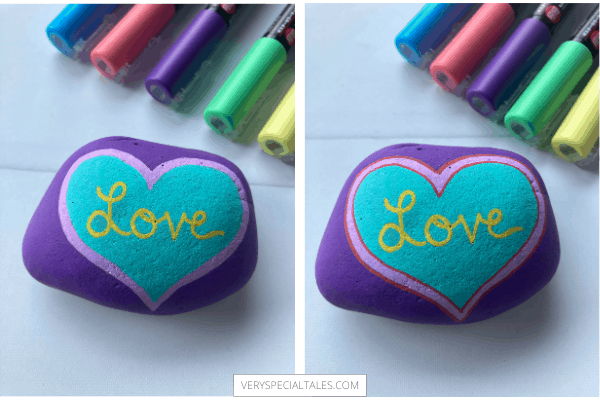
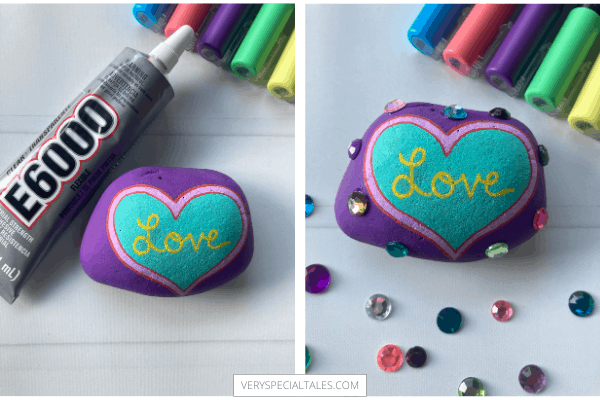
Rock 2: Love Gratitude Rock
(Steps 1 & 2 are the same in all tutorials)
- Trace a large heart shape on your rock with a pencil
- Using a light color like pink, draw a thick band over the pencil marks.

- Fill the center of the heart with a bright color.
We’ve chosen aqua for this one.
- Color the outside of the rock with a deeper/darker color like purple.

- In the center of the rock, write the word ‘love’ in pretty handwriting with a pencil.
This is a great moment to talk about the people that we care about. - Choose a bright color to color over the word to make it stand out.
- Outline both sides of the heart in red to create a bright border.
- Spray your rock with sealant.
You may choose to finish your project here, but we decided to add some gems to our rock
If you choose to end your rock here, great!If you choose to add gems to your rock, you must spray the rock with sealant before adding your glue and gems.
If you spray after the gems are added, the gem surfaces will become cloudy and sticky. - Wait an hour or two after spraying the rock before adding the gems.
- Add gems to your rock
To add gems to your rock, we used the E6000 adhesive brand to ensure the gems are strongly attached.
Add a small dot of glue and attach the gems to the areas you’d like.
Once you have attached all your gems, the rock is finished!
Wait 24 hours for the glue to dry before placing and handling it.
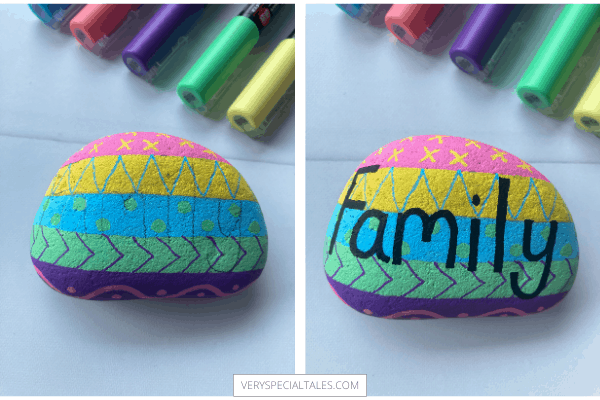
Rock 3: Family Gratitude Rock:
(Steps 1 & 2 are the same in all tutorials)
- Using bright colors, draw thick bands in different colors across your rock
- On each of the bands, use a differentiating color and draw fun, unique designs to give it a little pizzazz.

- With a pencil, trace out the word ‘family’ on the rock.
- Using black or a dark color, trace over the word to make it stand out.
- Spray the rock with a sealant to complete it.
Are you ready to start preparing your own Gratitude Rocks?
Other Gratitude Resources
- “I’m So Grateful” (Activities for Kids)
If you’d like more ways to explore gratitude with kids, take a look at “I’m So Grateful” in the shop.
It’s a fun collection of gratitude-themed activities, including a Gratitude Jar, gratitude coloring pages, a 30-Day Challenge, and other creative printables that help children notice, talk about, and celebrate the good things in their lives. - 31 Fun Gratitude Activities for Kids
- Gratitude Rocks (Tutorials) + 8 Fun Ideas on How to Use Them
How to Make Hand-Painted Gratitude Rocks
♥Would you Share This Pin? 👇♥


Thank you Clara! I appreciate your sharing – so helpful!!
Hi Clara!
Really appreciate your work and sharing it with us. Thank you so much!