Super Easy Sensory Jar with Water Beads
Water beads make an amazing sensory experience. Before I started this project, I had in mind sharing the delightful visual experience that a sensory bottle with water beads could represent.
But the fact is that this project has rendered hours of sensory fun long before we completed the bottle. I would actually say that in this case, the process has been even more satisfying that the outcome (don’t get me wrong, we still love our bottle!)
As you need to hydrate the water beads for a few hours before you start your project, we happened to end up with two bowls of water beads just when we couldn’t really get to the project. So, we had to leave them waiting for us till the following day.
You should have seen us, randomly walking to the bowls just to be able to put our hands inside. Yes, also me! Not just the kids.
So, let’s talk a bit about water beads before we dive into our sensory bottle preparation.

What are water beads?
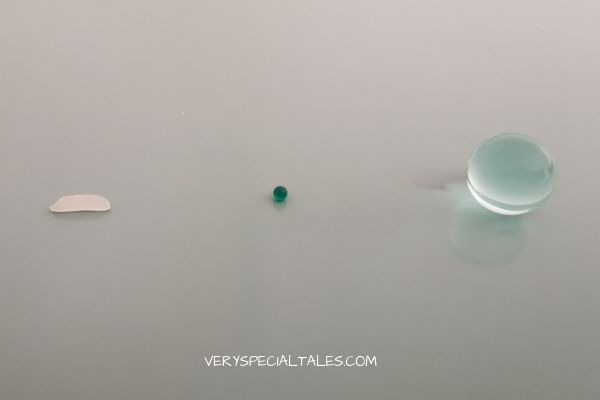
A water bead is a water-absorbing polymer. When presented in its dry form, it looks like a tiny spherical form. Once you deposit the bead in water, it absorbs a large amount of water and grows into a much larger form (they can swell to 400 times the original size!)
See a picture bellow of a dry and a hydrated bead.
What are water beads used for?
There are lots of uses for water beads. Some of the most common ones are:
- in gardens or pots to water plants
- decoration in vases
- in dry form, as absorbent filler for nappies
- and, obviously as a fun material for lots of sensory crafts like our sensory bottle with water beads (sensory bottles, squishies, sensory tables)
Are water beads dangerous?
Before we get any further, I would like to raise safety issues.
I’ve read pretty much everywhere that water beads are not dangerous because they are not toxic.
I would like to highlight here the difference between toxic and hazardous.
They aren’t indeed toxic. But, they may be a hazard. Hence, water beads need to be used under adult close supervision. Especially with younger kids or kids with disabilities.
A little kid may see the beads as candy-looking items and may be tempted to put it in the mouth. You need to assess if your child will see them as candy-looking items. I’m linking here to a report by the Medical Journal of Australia.
And now, that I’ve share this caution warning, let’s get back to check how we can use water beads.
How do I hydrate water beads?
In order to hydrate and expand water beads you just need to put them in a container and fill it with water.
Do water beads stay hydrated?
No, they don’t. They are meant to release water, so once they reach their final size and you remove them from water, they will start releasing water slowly.
How do I dispose of the water beads?
At some point in time, you may decide that you wish to get rid of your water beads.
That’s actually quite easy. Just mix them with soil and use them to water your plants.
Make sure you DON’T throw them down the drain as it may clog your pipes.
How to Make a Sensory Bottle with Water Beads
This is a very easy project. And it kept my daughter busy, sorting hydrated water beads, for a couple of hours (we bought them in an assortment of colors).
Materials for a Sensory Jar with Water Beads:
- Plastic jar/bottle
- Water beads- assorted colors
- Water
Instructions
– Put your water beads in a bowl and fill it with water
I’ve always been useless at estimating how much dry products expand after you process them in water (yes, I’m the type of person that always puts too much pasta to cook, and ends up with an excess of cooked pasta that nobody wants)
So, I started with what I felt was a small amount of beads, and ended up needing to add extra containers to fit all the beads.
Tip: I’ve read that adding 1-2 drops of bleach helps prevent mold. But I read it after I had already prepared our bottle, so I will have to wait for the next one to try this tip.
– Wait around 4 hours till they expand
You may even leave them overnight and work with them the following day.
-Separate the beads in colors
This was a big project! But actually fun. We all sat around the table sorting out water beads. Getting distracted touching them and squishing them. But we finally made it!
-Fill the plastic bottle with the beads, following your preferred color sequence.
I had a project in mind to produce a rainbow sequence. But my daughter has strong opinions and preferred to choose what she felt was a pretty sequence.
I’ve seen this type of bottle filled with baby oil. I actually like it just with the water beads. The fact that the bottle is closed will help slow down dehydration.
I’m going to be keeping it in the fridge to prevent mold growth. I’ll let you know if it works.
-Close the lid and your sensory bottle with water beads is ready!
You can read this recipe & print it from the card below.

Sensory Bottles with Water Beads
Super Easy Sensory Jar with Water Beads: an amazing and squishy sensory experience
Materials
- Plastic jar/bottle
- Water beads- assorted colors
- Water
Tools
- A bowl to hydrate the water beads
- A funnel to fill in the bottle with beads
Instructions
- Put your water beads in a bowl and fill it with water and wait arund 4 hours (you may leave them overnight)

- Separate the beads in colors

- Fill the bottle/jar with the beads, following your preferred color sequence

- Close the lid and your sensory jar is done!

Notes
Water beads need to be used under close supervision. Especially with younger kids or kids with disabilities.
Other DIY Sensory Bottles in this blog
Share our Sensory Bottles with Water Beads on Pinterest! ??