Worry Box: In this post, you will learn what a worry box is, why it works, and what the best fit could be for your child. You will also learn how to make a cute Worry Monster Box, a fun activity for home or the classroom.
What is a Worry Box?
A “Worry Box” is a place to store away those feelings that may overwhelm your child.
You may have read about this very same concept described as a Feelings Box, Acceptance Box, or Anxiety Box.
Or you may have come across slight variations that use different types of containers like jars. Those would be your Worry Jars, Feelings Jars, or Anxiety Jars.
It all works the same way.
When worry thoughts, frustration or overwhelming feelings strike, your child (or you, if your child needs help) can write them down on a piece of paper and store them away in their worry box (or whatever container you chose).
Related Reading: Tips & activities to help a child with anxiety
How Does a Feelings Box Work?
This is an amazing coping tool, as it allows your children to:
- Express their feelings by writing them on a paper (they can also make a drawing, or you can help them write it down)
- Take control of the situation.
They decide to put those feelings away, so they are taking control of their emotions. - Park feelings or emotions that they may not be able to cope with at the present moment until they are ready to deal with them.
They can go back to the box once they feel better, and decide to:- Face or tackle the situation
- Ask for help
- Accept and move on.
- Let feelings go.
Sometimes, there is nothing we can do about the situations or events that trigger our emotions. In those cases, it may be better to accept those feelings and let them go.
Kids that worry often may be able to use this tool in conjunction with the “Worry Time” strategy.
Worry time is a time in the day you allocate to think and talk about worries.
The rest of the time, they need to think about something different.
This is not easy to do when you feel worried about something. Asking them to stop thinking about it may even make them more focused on the worries. They may feel it is an “unfinished business” or they may worry they will forget about it.
A worry box comes really handy in this situation. You know you will go back to the problem, so it is easier to let your worries go for the moment.
(Disclosure: We are a participant in the Amazon Services LLC Associates Program, an affiliate advertising program designed to provide a means for us to earn fees by linking to Amazon.com and affiliated sites. As an Amazon Associate, I earn from qualifying purchases. There may also be other affiliate links in this post. You can also read our Disclosure & Disclaimer policy here)
Worry Box Ideas
There are two different ways you can approach the worry box concept:
- the imaginary worry box
- an actual (physical) box
Each of them has its own pros and cons, they may require certain skill sets and work in different contexts.
Let’s explore these two options.
An Imaginary Worry Box
This may work well if your child is capable of using their imagination and visualize the concept of a worry box.
It may also come in handy when you are away from home or school and you can’t have a physical box.
This is an example of a script you may use:
Sometimes when we feel worried, frustrated, or overwhelmed it may help us to store our problems away.
Imagine you have an imaginary box in your mind. We will call it your worry box.
Can you see it?
Is it big or small? New or old? What color is it? Does it have a lock?
Now, let’s think about the things that are upsetting you.
We are going to open the lid in our box, and we are going to put all those thoughts away.
We can do whatever we want with those thoughts. We can come back later, and deal with them. Or we may just leave them there and not worry about them again.
A Physical Worry Box
Some kids may find it difficult to use visualization techniques and will benefit from using an actual box.
Using the box and writing down your problems on paper also helps to turn something intangible into something they can actually touch, work with, and control.
We’ll share a tutorial for a fun monster worry box in the next section, but let’s be clear, this technique is equally effective with any box you may have lying around in the house.
You can also use a jar, an envelope, or any container that serves the same purpose of storing worries away.
When we first started using this tool, we recycled a small black box that he had in the house (image below).
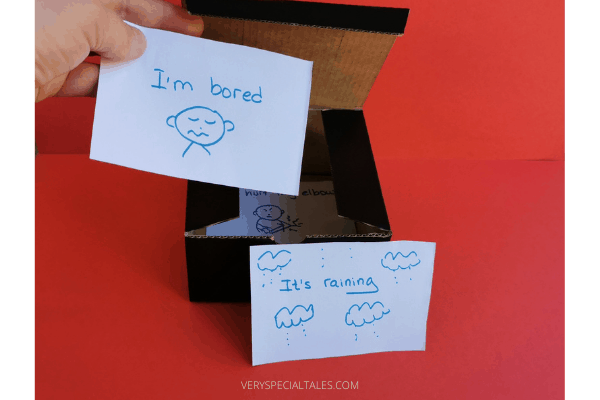
We often use it store away:
- Problems that we don’t have control over
- Little nuisances that annoy us and make us mad
You may use a similar script to the one we used for the imaginary box:
We are going to write down what is worrying (or upsetting) you right now.
We don’t need to do anything about it now.
We will put it away in our worry box, and you will decide if you need to come back to it later or not.
If you decide to come back to this thought, we may look for ways to solve this issue. We may also decide to just accept it.
While it is in the worry box, it can’t bother you.
Worry Monster Box Tutorial
Now we are going to do something really fun.
If you are looking for mindfulness crafts to do some work with your kids or students this can be a great project.
It will allow you to talk about emotions (worries, frustrations, anger, insecurities) while you engage in a fun activity.
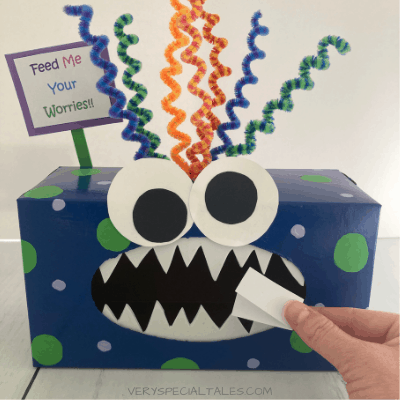
Let’s prepare a fun Worry Monster Box that will eat and take away our worries
Supplies:
- Tissue box
- Scissors
- Large paintbrush
- Small paintbrush
- 3 different colors of paint (we chose blue, purple, and green)
- Hot glue gun/glue
- Pencil
- Popsicle stick
- White card stock
- Black card stock
- White foam paper
- Purple foam paper
- Small cup
- Pipe cleaners
- Printed paper with “Feed Me Your Worries!!” written in a fun, colorful font
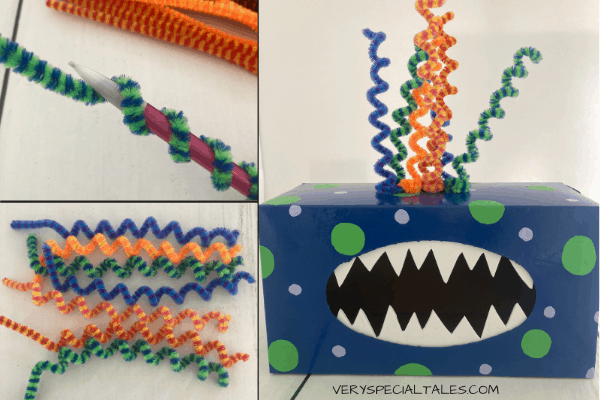
How to Make a Worry Box: Cute Worry Monster Box Tutorial
- Cut out the plastic part of the tissue box, as this will be the “mouth” of the monster.
- Paint the entire box blue. Set aside to dry.
- While the box is drying, you can start making the other parts. Take the popsicle stick and paint it green.

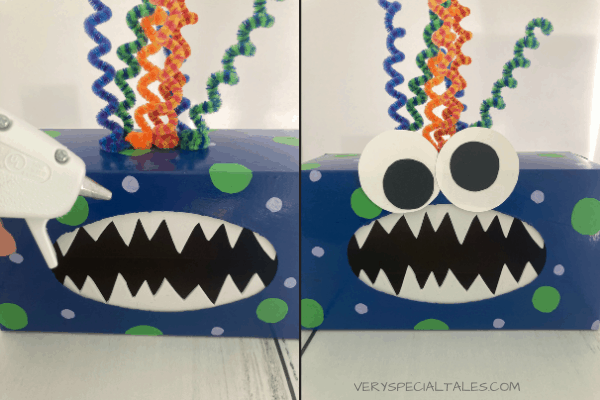
- Put a piece of white cardstock on the table. With your pencil, trace the bottom of a cup to make two big eyeballs. Set aside.
Take your black cardstock and put your tube of paint on it (or any object with a round base that is smaller than the one you use for the white cardstock).
With your pencil, trace the bottom of the paint tube to make two big pupils. Cut out the eyeballs and cut out the pupils. Set aside.
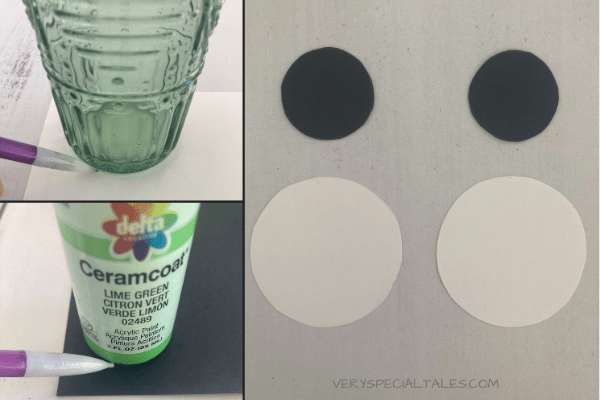
- Check your box to see if it has dried. If it has, start to paint large green polka dots all over the box. Once those have dried, start to paint small purple polka dots all over the box. Set aside to dry.

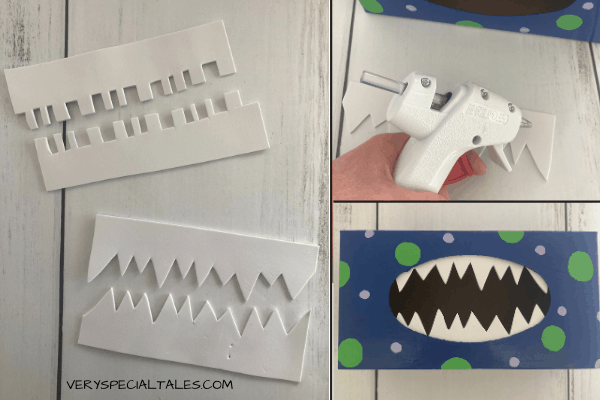
- While the box is drying, cut the white foam paper to look like teeth. You can make them square or triangular. We chose the triangular ones.
- With your hot glue gun, place a line of glue all the way down the line of the white foam teeth that you cut out.
- Place them on the inside of the box on the top and repeat for the bottom. You’ll want enough space to have an “open” mouth, showing teeth.
- Take your pipe cleaners and wrap them around your pencil to make them curly.
- Place a dab of glue on the top of the box. Place one of the curled pipe cleaners on top. Continue to make a cluster of curled pipe cleaner “hair” on top of the box.
- Bring out the eyeballs and pupils. Glue the pupils to the eyeballs.
- Place a dab of glue above the open mouth in the center of the box for each eyeball. Place the eyeballs on the box.
- Place a line of glue on the bottom part of the popsicle stick and glue it to the back of the box.
- Cut out a square piece of the purple foam paper and glue it to the green popsicle stick.
- Cut out your paper that says “Feed Me Your Worries!!” and glue it to the purple foam paper.
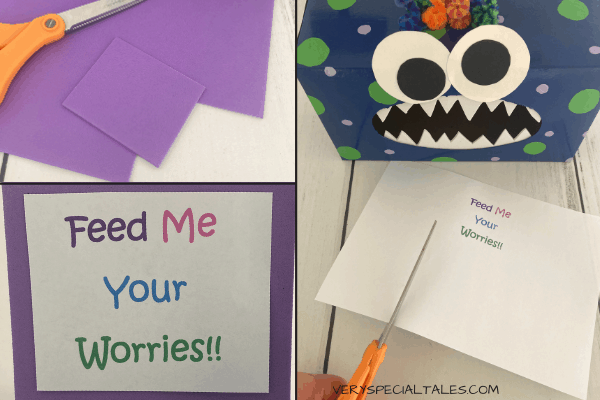
- Your monster is now complete! Feed him any worries you may have!

Would you like to make sure you don’t lose this tutorial? Pin it to go back to it later😊⇓


Hi,
I’m wondering if I could use the physical sorry box with my classroom without them having to make their own. Like we would have one for our class to use or would it be better to use the imaginary one instead?
Love these ideas!
Thanks
Hi Kemee,
I believe a physical option is better if you plan to revisit and address the worries later. With the imaginary approach, there’s a chance they might forget what they wanted to deal with.
And you don’t really need to prepare a fancy worry box. This technique is just as effective using any box, jar, or container you already have at home to store worries away.
Thanks for your message!
Clara